hikes.guideLake District

15.93 km · ~850 m ascent · ~4.5–6 h · loop · 4 summits

Home / Routes / Helm Crag & Far Easedale
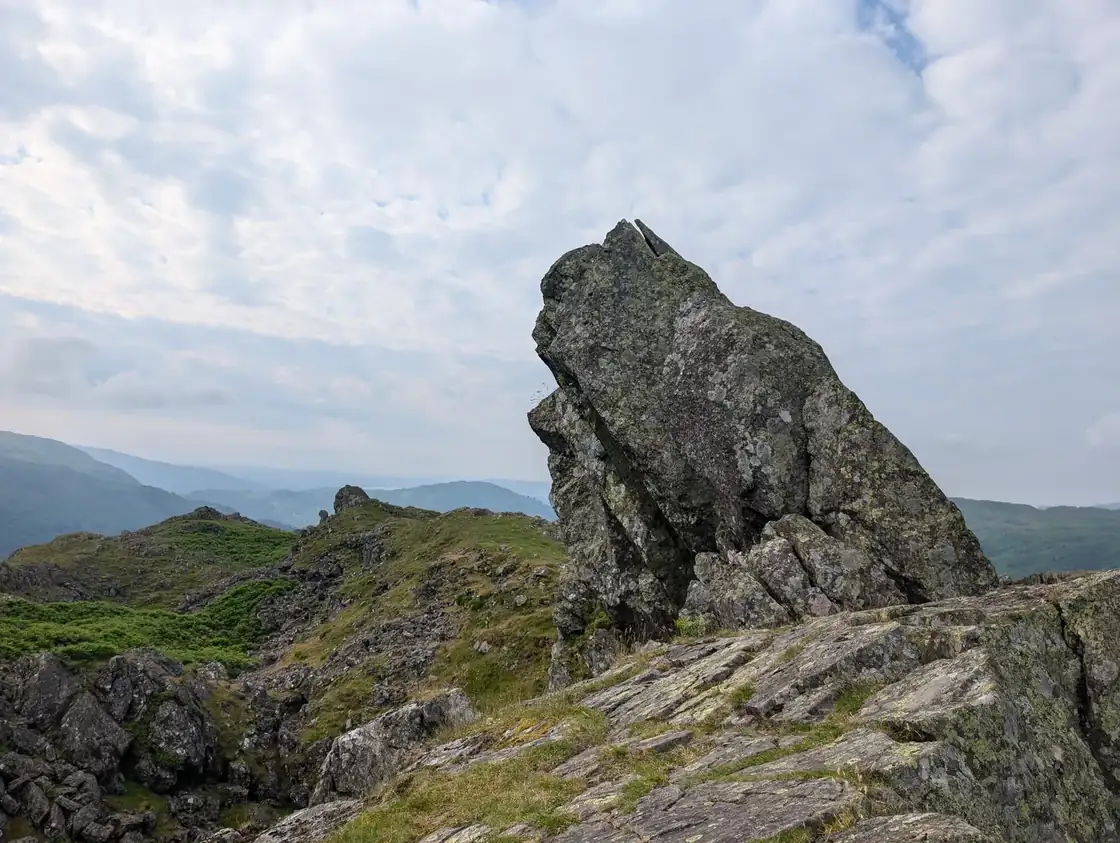
Helm Crag above Grasmere
Hard distanceLoop

Helm Crag & Far Easedale

15.93 km
Distance
~4.5–6 h
Typical time
~850 m
Ascent
4
Summits

Photo: © Lee McCoy

Download GPX →Walked by Lee, January 2025

Key facts

Distance 15.93 km
Ascent ~850 m
Descent ~850 m
Time ~4.5–6 h
Type Loop
Start Grasmere Village
The full skyline of Far Easedale from Grasmere — Helm Crag's rocky top first, then Gibson Knott, Calf Crag and Steel Fell around the rim of the valley. A long day at 15.9 km, and the head of Easedale can be vague in cloud.
A planned line is a suggestion, not a guarantee — conditions change. Navigate independently and carry a map & compass. How to use this guide.

Difficulty profile

LengthHard15.93 km — a long day out.
SteepnessHardSteepest sustained pull about 29% around the 9.9 km mark.
TerrainModerateMostly good mountain path. desk assessment — not field-verified
NavigationModerateMostly clear, but the Far Easedale head can be vague in cloud — carry a map.
ExposureNot assessedExposure (drops, scrambling, how bad a slip would be) can’t be judged from gradient data alone, so we don’t guess. A rating appears once the route is editorially assessed or walked.

Five independent axes, not one score. “Desk” ratings come from maps and guidebooks, not yet walked — treat them as a guide, not a survey.

Conditions on this route

We score every Lakeland Wainwright each morning on cloud, wind, rain and underfoot, and this route crosses 4 of them. The worst summit governs the verdict — a route is only as kind as its roughest top.

Modelled guidance — not a substitute for the mountain forecast or your own judgement. See how every fell ranks today →

Daylight & turnaround

Daylight is short from October to February — check today’s sunrise and sunset before you set off, and carry a head-torch and spare batteries. On short days, decide your turn-back time before you start.

OpenTopoMap
Elevation profile, shaded by steepness
Elevation profile Rises from about 68 m to 550 m over 15.9 km, with the summits marked in order. The area beneath is shaded by sustained steepness over a 250 m window, in the same four bands as the route’s steepness rating: Easy under 15%, Moderate 15 to 25%, Hard 25 to 35%, Severe above 35%. 550 m 68 m 0 km 15.9 km 1234

1 Helm Crag2 Gibson Knott3 Calf Crag4 Steel Fell (Dead Pike - Steel Fell)

Easy 66%Moderate 30%Hard 4%Severe

~850 m
Total ascent
550 m
High point
68 m
Start height

Free mapping: OpenTopoMap / OpenStreetMap (switch layers top-right).

This walk covers about 15.93 km with around 850 m of ascent, taking in 4 summits. The map above shows the line; the elevation profile and stage notes are below.

Access & barriers

Can a dog, a buggy or dodgy knees manage this route? A quick read from the gates and stiles mapped along the way.

Dog
Mostly gates
Buggy
Not buggy-able
Knees
Steep in places
  • Dog: A stile of unmapped type — a dog may need lifting over.
  • Buggy: Stiles or rough going on the route.
  • Knees: A sustained ~29% descent around the 9.8 km mark — a little jarring on tired knees.

On the line: 13 gates · 1 stile (type unmapped)

These are mapped barriers, from OpenStreetMap — coverage in the Lakes is good but not guaranteed complete. Spotted a stile or gate we’ve missed? Tell us (opens in new tab) and we’ll fix it. Barrier data as of 2026-07-09. Access data © OpenStreetMap contributors (via Overpass).

Pacing

SummitCumulativeAscentTime (fast–steady)
1Helm Crag3.5 km322 m1:15–1:39
2Gibson Knott4.8 km391 m1:37–2:09
3Calf Crag6.6 km518 m2:11–2:54
4Steel Fell (Dead Pike - Steel Fell)9.0 km604 m2:49–3:44
Finish15.9 km850 m4:36–6:07

Naismith-based estimate — a fast/steady range. Your pace will vary. These use Naismith’s textbook constants (5 km/h, 600 m of ascent an hour). Measured against a pace fitted to 41 recorded Lakeland walks they run about 8% slow, and we have left them that way deliberately: a slow estimate strands nobody.

The walk, stage by stage

  1. 1

    Start → Helm Crag (3.5 km, 322 m)

    Climb of about 322 m over 3.5 km (around 9% average).

    Start in Grasmere village, heading out along Easedale Road. Before reaching the open valley, turn right up the lane towards the Lancrigg Hotel. The path winds behind the hotel and begins a steep, relentless zig-zag ascent up the southern nose of Helm Crag. The path is well-made but unforgivingly steep. As you crest the summit ridge, you will be greeted by the famous rock formations that give the fell its iconic silhouette

    Waypoints

    Easedale Road, Lancrigg, the zig-zag path, The Lion and the Lamb (first rock formation), The Howitzer (true summit rock)

    Decision point

    The path from Lancrigg is highly engineered and impossible to lose

    Easy to get wrong

    The initial climb is a steep lung-buster. However, the real challenge is the true summit—The Howitzer. This is a slanted, highly exposed slab of rock. Reaching the very top requires a tricky Grade 1 scramble with a sheer drop on one side. Most walkers touch the base of the rock and consider it "bagged" rather than risking the climb

    If you need to get off

    Turn around and descend the zig-zag path straight back to Grasmere

  2. 2

    Helm Crag → Gibson Knott (1.3 km, 69 m)

    Climb of about 69 m over 1.3 km (around 5% average).

    From Helm Crag, the route turns North-West. You are now on the ridge proper. The path drops steeply into a depression before climbing back up over a series of rocky bumps and small tarns to reach the summit of Gibson Knott

    Waypoints

    The Helm Crag descent, the ridge path, Gibson Knott summit

    Decision point

    Stay on the crest of the ridge. The path weaves around the crags but remains generally central

    Easy to get wrong

    This section is an undulating "rollercoaster." The depressions between the rocky bumps hold a lot of water and are notoriously boggy

    If you need to get off

    Retreat to Helm Crag and descend. Do not try to shortcut off the sides of the ridge into Far Easedale or Greenburn; the flanks are guarded by steep, pathless bracken and crags

  3. 3

    Gibson Knott → Calf Crag (1.8 km, 127 m)

    Climb of about 127 m over 1.8 km (around 7% average).

    Continue North-West along the ridge line. The terrain gradually becomes less rocky and more grassy/peaty. You will cross a few more depressions, including Bracken Hause, before making a final, steady grassy pull up to the summit of Calf Crag, which is marked by a small cairn perched on a rocky outcrop

    Waypoints

    Bracken Hause (the lowest dip), Calf Crag summit

    Decision point

    The path occasionally braids as people seek drier ground, but as long as you keep heading North-West along the highest ground, you will hit Calf Crag

    Easy to get wrong

    The bogs intensify here. In wet weather, you will spend a lot of time detouring around deep peat hags

    If you need to get off

    Just before the final climb to Calf Crag (at Bracken Hause), a path drops away to your left (South-West) into the Far Easedale valley. This is a brilliant escape route. It provides a long, safe, well-graded valley walk all the way back to Grasmere, bypassing the bogs and the Steel Fell descent entirely

  4. 4

    Calf Crag → Steel Fell (Dead Pike - Steel Fell) (2.4 km, 87 m)

    Climb of about 87 m over 2.4 km (around 4% average).

    You are now crossing the head of the valley to switch ridges. From Calf Crag, head East across the watershed. You must navigate the wide, featureless expanse of Brownrigg Moss. Once across the marshy depression, the ground rises, and you turn South-East to follow the broad, grassy back of Steel Fell to its summit

    Waypoints

    Brownrigg Moss (the boggy saddle), old fence line, Steel Fell summit (Dead Pike)

    Decision point

    Look for the remnants of old rusted iron fence posts. They act as a reliable guide across the featureless moss and up onto the Steel Fell ridge

    Easy to get wrong

    Brownrigg Moss is a notorious navigational trap and a terrible bog. It is incredibly wet, and the paths completely disappear into the peat. In low visibility, it is very easy to lose your bearings here

    If you need to get off

    If the bogs of Brownrigg Moss are impassable, turn back to Calf Crag and use the Far Easedale descent into the valley

  5. Steel Fell (Dead Pike - Steel Fell) → Finish (6.9 km, 246 m)

    Climb of about 246 m over 6.9 km (around 4% average).

    From the summit of Steel Fell, continue South-East. The grassy ridge suddenly rolls over into a brutally steep descent down the "nose" of the fell toward Town Head (near the Dunmail Raise road). Once you reach the valley floor, the route utilizes the low-level country lanes, bridleways, and field paths (often running parallel to the A591) to undulate your way back into the centre of Grasmere

    Waypoints

    The steep Steel Fell nose, Town Head farm, Helmside, Grasmere village

    Decision point

    During the descent, the main A591 road and the buildings of Town Head are clearly visible directly below you as a target

    Easy to get wrong

    The descent off the front of Steel Fell is a legendary "knee-wrecker." It is a relentlessly steep grass slope. When wet, it is effectively a water slide, and slipping is common. Trekking poles are highly recommended here

    If you need to get off

    You are on the final descent to the valley floor. Once down, you are safely on the road network back to the start

Summits bagged (4)

  1. 1Helm Crag405 mCentral · Wainwright, Birkett, Fellranger, Synge
  2. 2Gibson Knott420 mCentral · Wainwright, Birkett, Fellranger, Synge
  3. 3Calf Crag537 mCentral · Wainwright, Birkett, Fellranger, Synge
  4. 4Steel Fell (Dead Pike - Steel Fell)553 mCentral · Wainwright, Birkett, Fellranger, Synge

In the order you walk them — the same numbers the elevation profile, the stage notes and the pacing table use.

Getting there & parking

Driving an electric car? Grasmere village (paid) has a verified public charger 216 m away — Grasmere Stock Lane (LA22 9SJ), 3 kW. Over about 4.6 hours on the hill that is up to 14 kWh, which is a ceiling and not a promise. EV charging at this start → (checked 2026-08-05).

Stock Lane Car & Coach Park (LDNPA, paid) — 0.0 km from the start (straight line)
Walking base for Lang How, Swinescar Pike, Castle How (Raw Pike) and Stone Arthur — the 'Castle How & Lang How - Birketts' route starts 11 m away. Also serves 'Stone Arthur from Grasmere'. Fees: £6.50/2h, £7.50/3h, £8/4h, £8.50/5h, £10/24h (+20p app fee) (aggregator-listed). For Helm Crag, Silver How, the Easedale fells and the Far Easedale round. Signed as Stock Lane Car & Coach Park at the entrance. Pay and display (OSM-tagged).
🕑 Typically full before 10:00 on fine weekends, Apr-Oct — Lee McCoy, local observation, 2026-08-09.
Directions (opens in new tab)Something changed here?
If it is full: Red Bank car park, Grasmere (0.4 km); Grasmere, roadside layby (free) (0.5 km); Broadgate Meadow car park, Grasmere (0.7 km, 23 m up)
Silver How, north-east car park — 0.1 km from the start (straight line)
Walking base for Stone Arthur, Helm Crag, Gibson Knott and Calf Crag — the 'Stone Arthur from Grasmere' route starts 77 m away. Also serves 'Helm Crag & Far Easedale'. Fee not verified — check signage on arrival. OpenStreetMap records parking allowed for a fee at weekends and in school holidays (2026-07-24 extract; unconfirmed by an operator - check on arrival).
Directions (opens in new tab)Something changed here?
Thirteen Valleys, Grasmere (LDNPA, paid) — 0.3 km from the start (straight line)
Walking base for Tarn Crag (Easedale), Codale Head, Sergeant Man and Blea Rigg — the 'West of Grasmere' route starts 45 m away. Also serves 'Helm Crag & Far Easedale'. Fees: pay and display; coins and cards; RingGo ID 37338 (LDNPA, checked Aug 2026).
Directions (opens in new tab)Something changed here?
Roam Charging Station, Grasmere — 0.3 km from the start (straight line)
1.4 km from Silver How. Roam Charging Station.
Directions (opens in new tab)Something changed here?
Red Bank Road, Grasmere (W&F, paid) — 0.3 km from the start (straight line)
Walking base for Tarn Crag (Easedale), Codale Head, Sergeant Man and Blea Rigg — the 'West of Grasmere' route starts 6 m away. Also serves 'Helm Crag & Far Easedale'. Fees: pay and display.
Directions (opens in new tab)Something changed here?

Positions are approximate.

Vehicles are left entirely at their owner’s risk. We list places people park; we cannot vouch for any of them. Judge it on the day: take valuables with you, leave nothing on show, and if a spot feels wrong when you get there, park somewhere else.

Every option near this start, on the parking map →

Water, shelter & getting away

On-route facilities © OpenStreetMap contributors — an absent marker does not mean the facility isn’t there.

Buses

The 555 stops at Grasmere, at School, 50 m from this start. Last bus: Monday to Friday 20:46 towards Keswick (555); Saturday 20:46 towards Keswick (555); Sunday 18:36 towards Keswick (555). Checked against the operator’s timetable, 7 September 2026. Times here are a guide, not a promise — leave yourself more than the minute.

The 555 passes this route at 0.1 km (Grasmere School (near), 0 m off the line). It passes again at 10.9 km.

Stagecoach 555
Kendal – Staveley – Windermere – Ambleside – Rydal – Grasmere – Thirlmere (Wythburn & Swirls) – Keswick
Catch it from: Windermere · Ambleside
Year-round, roughly hourly. The backbone bus of the A591 — ideal for Helvellyn (Wythburn/Swirls), Fairfield, the Central fells and anything around Grasmere/Rydal. From Penrith, take the X4/X5 to Keswick and change.

Rural routes change seasonally — confirm on stagecoachbus.com (opens in new tab) or Traveline before travelling.

If the parking is full

There is no real plan B here. Every place we know beside this route serves the same walks and sits close together, so if one is full the others usually are too. Worth starting early, or having a different walk in mind before you set off.

  • Red Bank Road, Grasmere (W&F, paid)
  • Helm Crag car park (paid)
  • Nab Scar (layby)

Worked out from the parking we hold within walking reach of this route and the other walks each place serves — two places that serve the same walks fill for the same reasons. We are not saying whether anywhere has spaces today, and we never will: this is what exists, not what is free.

Toilets and refreshments

At Stock Lane Car & Coach Park (LDNPA, paid), the closest parking we hold to where this route starts:

Distances are straight lines from the car park, not walking routes. Opening hours change; none of this is checked daily.

When the sun reaches the tops

Not sunrise — the moment the sun clears the skyline from that summit, which on a fell with high ground to its east can be a good deal later. The two equinoxes are shown because they fall in the walking season, and late December too wherever a top keeps you waiting then; the clock gap between the equinoxes is British Summer Time, not the hill. Rounded to the nearest quarter hour and meant as a general idea, not a schedule.

  • Helm Crag — in late March the sun reaches it around 06:45, about half an hour later. In late September, about 07:30. It waits longest in midsummer — about an hour after sunrise.
  • Gibson Knott — in late March the sun reaches it around 06:45, about half an hour later. In late September, about 07:30. It waits longest in midsummer — about an hour after sunrise.
  • Calf Crag — in late March the sun reaches it around 06:30, about a quarter of an hour later. In late September, about 07:15. It waits longest in midsummer — about half an hour after sunrise.
  • Steel Fell (Dead Pike - Steel Fell) — in late March the sun reaches it around 06:45, about a quarter of an hour later. In late September, about 07:15. It waits longest in midsummer — about an hour after sunrise.

Modelled from a 30 m elevation model against each summit’s own skyline — the same figures the fell pages carry, never observed. Cloud is not in it.

Safety & conditions

Check live conditions in the “From the fells” panel, on MWIS (opens in new tab) and the Met Office mountain forecast (opens in new tab) before you set off.

Make it easier or harder

Short version: turn back at about 7.8 km (drop to Start) — roughly half the distance.

Download

Download GPX

GPX track for your GPS or phone.

Places to stay near this start

From Grasmere: 11 places

Similar routes nearby

All routes →