hikes.guideLake District

20.8 km · ~1279 m ascent · ~6–8.5 h · loop · 9 summits

Home / Routes / The Coniston Horseshoe
Wetherlam, the first top of the Coniston Horseshoe
Severe distanceLoop

The Coniston Horseshoe

20.8 km
Distance
~6–8.5 h
Typical time
~1279 m
Ascent
9
Summits

Photo: © Lee McCoy

Download GPX →Walked by Lee, August 2024

Key facts

Distance 20.8 km
Ascent ~1279 m
Descent ~1274 m
Time ~6–8.5 h
Type Loop
Start Coniston village
The full Coniston Horseshoe — the grand ~21 km, ~1,280 m round of seven Wainwrights above Coniston: Wetherlam, the steep Prison Band onto Swirl How, Great Carrs, Grey Friar, Brim Fell, the Old Man of Coniston and Dow Crag. The big day out; for the shorter version see the [Coniston Old Man round](/routes/coniston-old-man-round.html).

✎️ Walked and described first-hand by Lee, Wetherlam-first — the full Coniston round over all the major tops, a long and serious mountain day. The trickiest navigation is the Grey Friar–Calf Cove–Levers Hawse traverse and the Lad Stones ground; carry OS Explorer OL6 and a compass for the clag.

A planned line is a suggestion, not a guarantee — conditions change. Navigate independently and carry a map & compass. How to use this guide.

Difficulty profile

LengthSevere20.8 km — a long day out.
SteepnessSevereSteepest sustained pull about 37% around the 7.7 km mark.
TerrainModerateMostly good mountain path — rough/natural surface. desk assessment — not field-verified
NavigationHardBroad or featureless ground where navigation is serious in cloud — map and compass needed.
ExposureNot assessedExposure (drops, scrambling, how bad a slip would be) can’t be judged from gradient data alone, so we don’t guess. A rating appears once the route is editorially assessed or walked.

Five independent axes, not one score. “Desk” ratings come from maps and guidebooks, not yet walked — treat them as a guide, not a survey.

Conditions on this route

We score every Lakeland Wainwright each morning on cloud, wind, rain and underfoot, and this route crosses 7 of them. The worst summit governs the verdict — a route is only as kind as its roughest top.

Modelled guidance — not a substitute for the mountain forecast or your own judgement. See how every fell ranks today →

Daylight & turnaround

Daylight is short from October to February — check today’s sunrise and sunset before you set off, and carry a head-torch and spare batteries. On short days, decide your turn-back time before you start.

OpenTopoMap
Elevation profile, shaded by steepness
Elevation profile Rises from about 165 m to 789 m over 20.8 km, with the summits marked in order. The area beneath is shaded by sustained steepness over a 250 m window, in the same four bands as the route’s steepness rating: Easy under 15%, Moderate 15 to 25%, Hard 25 to 35%, Severe above 35%. 789 m 165 m 0 km 20.8 km 123456789

1 Wetherlam2 Swirl How3 Great Carrs4 Grey Friar5 Brim Fell6 The Old Man of Coniston (Coniston Old Man)7 Dow Crag8 Buck Pike - Seathwaite Fell9 Brown Pike

Easy 72%Moderate 23%Hard 5%Severe <1%

~1279 m
Total ascent
789 m
High point
226 m
Start height

Free mapping: OpenTopoMap / OpenStreetMap (switch layers top-right).

This walk covers about 20.8 km with around 1279 m of ascent, taking in 9 summits. The map above shows the line; the elevation profile and stage notes are below.

Access & barriers

Can a dog, a buggy or dodgy knees manage this route? A quick read from the gates and stiles mapped along the way.

Dog
Mostly gates
Buggy
Not buggy-able
Knees
Steep in places
  • Dog: A stile of unmapped type — a dog may need lifting over.
  • Buggy: Stiles or rough going on the route.
  • Knees: A sustained ~28% descent around the 14.6 km mark — a little jarring on tired knees.

On the line: 5 gates · 1 stile (type unmapped)

These are mapped barriers, from OpenStreetMap — coverage in the Lakes is good but not guaranteed complete. Spotted a stile or gate we’ve missed? Tell us (opens in new tab) and we’ll fix it. Barrier data as of 2026-07-09. Access data © OpenStreetMap contributors (via Overpass).

Pacing

SummitCumulativeAscentTime (fast–steady)
1Wetherlam6.2 km689 m2:23–3:10
2Swirl How8.1 km866 m3:03–4:04
3Great Carrs8.7 km866 m3:10–4:13
4Grey Friar9.9 km935 m3:32–4:42
5Brim Fell12.9 km1084 m4:24–5:51
6The Old Man of Coniston (Coniston Old Man)13.7 km1086 m4:33–6:04
7Dow Crag15.7 km1273 m5:15–6:59
8Buck Pike - Seathwaite Fell16.3 km1274 m5:22–7:09
9Brown Pike17.0 km1274 m5:31–7:20
Finish20.8 km1279 m6:18–8:22

Naismith-based estimate — a fast/steady range. Your pace will vary. These use Naismith’s textbook constants (5 km/h, 600 m of ascent an hour). Measured against a pace fitted to 41 recorded Lakeland walks they run about 8% slow, and we have left them that way deliberately: a slow estimate strands nobody.

The walk, stage by stage

  1. 1

    Coniston village → Wetherlam (6.2 km, 689 m)

    Climb of about 689 m over 6.2 km (around 11% average).

    Coniston Water lying pale in the morning haze below a rough, rocky fellside, with wooded ridges and low farmland stretching away beyond it
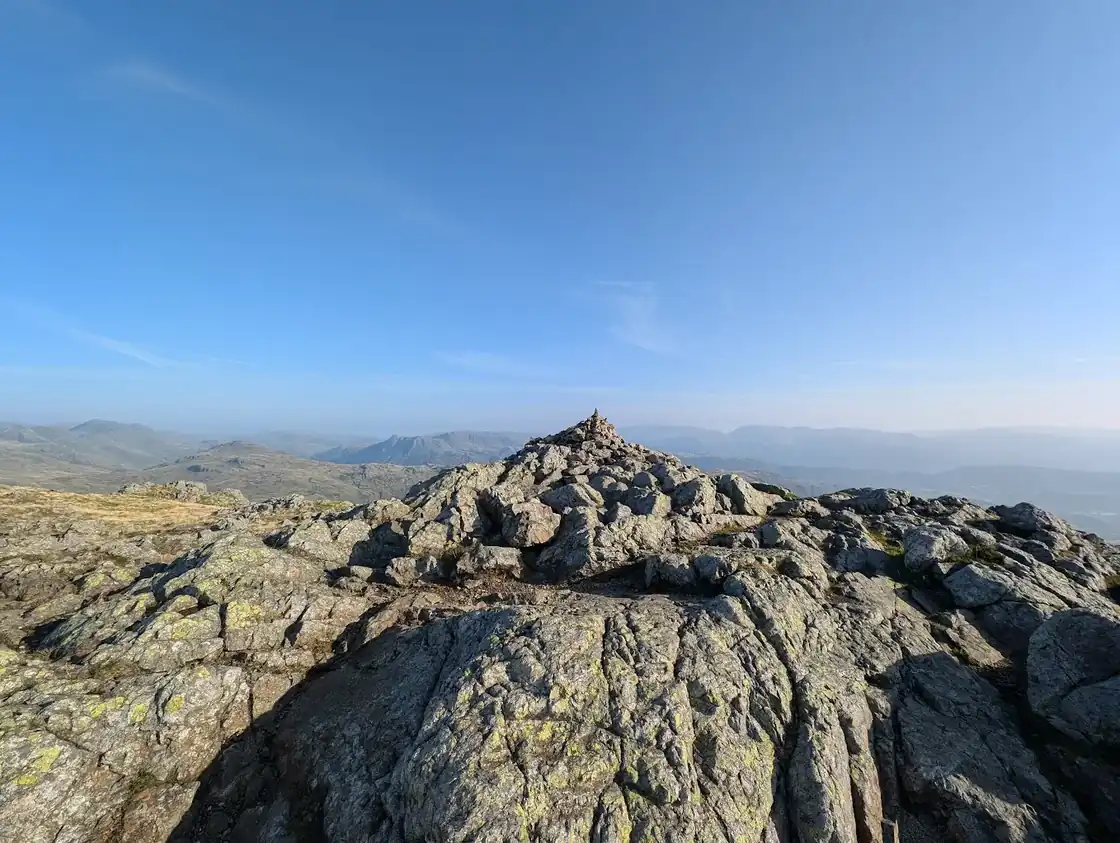
    A small cairn on a summit of bare, water-worn rock slabs, with distant fells fading into haze beyond
    © Lee McCoy · 2 photographs
  2. 2

    Wetherlam → Swirl How (1.9 km, 176 m)

    Climb of about 176 m over 1.9 km (around 9% average).

    Decision point

    From Wetherlam follow the clear ridge path NW, descending to a col then rising over knobbly Black Sails (modest cairn). Continue toward Swirl How; the ridge soon steepens sharply — this is Prison Band — a rocky descent of short, steep, eroded steps; zig-zag carefully, hands for balance, down to Swirl Hawse. From the saddle take the main path rising NW, steep on broken stone, in short pulls to Swirl How's large, crescent-shaped summit cairn.

    Easy to get wrong

    Prison Band is the crux of this leg — rocky and eroded with the ground falling away on both sides; in mist or wind take extra care and keep to the main (safest) line. Swirl Hawse is a path junction — make sure you take the NW climb to Swirl How.

    A wide panorama from a stony ridge top, rocky outcrops to the left and rank after rank of pale fells running to the horizon
    Looking down over a high hollow holding two small tarns, with old quarry workings on the slope beyond and the lake and lowland far belowSteep crags falling from a high shoulder into rough fellside, with rank after rank of pale hazy tops running to the horizon
    © Lee McCoy · 3 photographs
  3. 3

    Swirl How → Great Carrs (0.6 km, 1 m)

    Undulating section of about 0.6 km.

    Decision point

    A short, airy ridge: from Swirl How follow the obvious path NW along the curving crest above Greenburn, dropping slightly then rising. You pass the memorial and wreckage of the 1944 Canadian bomber just below the crest, then a small cairn marks Great Carrs.

    Easy to get wrong

    Stay on the crest — avoid the narrow trods that drift right toward the steep ground above Greenburn.

    A broad grassy summit scattered with stones, with a rocky knoll ahead and a wide valley falling away to the right
    A broad grassy summit scattered with stones, with a rocky knoll ahead and a wide valley falling away to the right
    © Lee McCoy · 2 photographs
  4. 4

    Great Carrs → Grey Friar (1.2 km, 69 m)

    Climb of about 69 m over 1.2 km (around 6% average).

    Decision point

    From Great Carrs retrace a few metres, then bear W/SW on a faint path over open grass-and-rock moorland to Grey Friar — a rounded dome with rocky tops and several cairns near the summit, including the main cairn and the distinctive 'Matterhorn Rock'.

    Easy to get wrong

    The path fades here. In clear weather Grey Friar is obvious ahead; in mist take a bearing and keep slightly left of the steep drop back into Greenburn — stay on the broad upland, not the edge.

    A tall pointed slab of rock standing alone on a plateau of tussocky grass, with range after range of hazy blue fells behind it
    © Lee McCoy
  5. 5

    Grey Friar → Brim Fell (3.0 km, 149 m)

    Climb of about 149 m over 3.0 km (around 5% average).

    Decision point

    The trickiest navigation of the round. From Grey Friar head back E/SE to regain the clearer path toward Swirl Band, then leave it to contour across pathless ground around the upper rim of Calf Cove — above its wet ground but below the rocky rim of Swirl Band — aiming to intercept the distinct path that drops from Brim Fell to Levers Hawse. Follow that down to Levers Hawse (a narrow rocky col, big drops to Seathwaite Tarn one side and Levers Water the other), then take the cairned path SE — steep at first on broken stone, easing along the ridge — to Brim Fell's huge summit cairn.

    Easy to get wrong

    This is the leg to get wrong in clag. After Grey Friar you leave the path to cut across Calf Cove — keep Levers Hawse and Seathwaite Tarn to your right-front (SW) and don't drift too high back toward Swirl How. Aim to pick up the Brim Fell–Levers Hawse path; that's your handrail to the col.

    Looking down a wide green valley from its head, with a small tarn in the middle distance, a stony path descending and scree in the foreground
    A large stone cairn on a stony, shattered summit plateau, with the next rounded top rising ahead across a shallow col
    © Lee McCoy · 2 photographs
  6. 6

    Brim Fell → The Old Man of Coniston (Coniston Old Man) (0.8 km, 2 m)

    Undulating section of about 0.8 km.

    Decision point

    An easy, well-cairned link: from Brim Fell's big cairn follow the wide path south along the ridge, gently undulating over minor rocky steps, to the Old Man's rocky summit plateau (the column, big cairn, usually crowds).

    Easy to get wrong

    Low Water and the scarred mine zig-zags are below to your left (east) — stay on the broad ridge path, not the mine descents, until the summit.

    A stony path along the summit ridge with the fellside dropping away to Coniston village and the long stretch of Coniston Water in the haze below
    © Lee McCoy
  7. 7

    The Old Man of Coniston (Coniston Old Man) → Dow Crag (1.9 km, 187 m)

    Climb of about 187 m over 1.9 km (around 10% average).

    Decision point

    From the Old Man summit take the path SW dropping toward Goat's Hawse — eroded stone and steep zig-zags first, then gentler — to the well-defined col (paths converge from Old Man, Brim Fell and Dow Crag; Goat's Water below to the west). Cross it and take the clear path climbing south up the ridge to Dow Crag; it steepens with short scrambly steps near the top (hands helpful, exposure moderate if you stay on the path) to the rocky summit cairn above the great east face over Goat's Water.

    Easy to get wrong

    At Goat's Hawse, orient before climbing — three paths meet there. Near Dow Crag's summit keep slightly left (west) to avoid the gullies and crags dropping right (east) to Goat's Water — a serious edge.

    A slate-strewn summit with a low cairn, looking out over Coniston Water and its wooded shores to the estuary and sea in the far distance
    A slate-strewn summit with a low cairn, looking out over Coniston Water and its wooded shores to the estuary and sea in the far distanceA long wall of dark crag falling from a shapely summit ridge, with sheep grazing the short grass in the foreground and a path climbing the shoulderDark broken crags in the foreground with a deep valley below, a beck threading its floor and the sea shining beyond the low country
    © Lee McCoy · 4 photographs
  8. 8

    Dow Crag → Buck Pike - Seathwaite Fell (0.6 km, 1 m)

    Undulating section of about 0.6 km.

    Decision point

    Continue south along the ridge on the main worn line over small ups and downs to Buck Pike, a small rocky rise with a modest cairn and a fine view back to Dow Crag.

    Easy to get wrong

    The path keeps a sensible distance from the steep eastern edge above Goat's Water — don't drift right toward the gullies, especially in mist.

  9. 9

    Buck Pike - Seathwaite Fell → Brown Pike (0.7 km, 0 m)

    Descent of about 73 m over 0.7 km.

    Decision point

    Keep on the ridge path south; it descends gently then rises slightly to Brown Pike's small summit cairn, where the ground begins to feel less severe and Walna Scar Road comes into view below to the east.

    Easy to get wrong

    Straightforward — keep to the crest line over the gentle drop and rise to Brown Pike.

  10. Brown Pike → Finish (3.8 km, 5 m)

    Descent of about 425 m over 3.8 km.

    Decision point

    From Brown Pike continue a short way south; just over the crest, look for the clear path branching right (east) descending toward Walna Scar Road over grass and stone. Follow it down as it curves to meet the broad Walna Scar Road track and turn left (east). Follow the track east — wide and stony, gently undulating past Cove Bridge and a small stone shelter — back to the Fellgate gate and car park. (To finish in Coniston instead, carry on down Coppermines Lane past Miners Bridge into the village.)

    Easy to get wrong

    Take the right-hand (east) branch just over Brown Pike's crest for Walna Scar Road — don't carry straight on south down the ridge. Then it's left (east) onto the track back to Fellgate.

Summits bagged (9)

  1. 1Wetherlam763 mSouthern · Wainwright, Birkett, Fellranger, Synge, Nuttall, HuMP
  2. 2Swirl How802 mSouthern · Wainwright, Birkett, Fellranger, Synge, Nuttall, HuMP
  3. 3Great Carrs785 mSouthern · Wainwright, Birkett, Fellranger, Synge, Nuttall
  4. 4Grey Friar773 mSouthern · Wainwright, Birkett, Fellranger, Synge, Nuttall
  5. 5Brim Fell796 mSouthern · Wainwright, Birkett, Fellranger, Synge, Nuttall
  6. 6The Old Man of Coniston (Coniston Old Man)802 mSouthern · Wainwright, Birkett, Fellranger, Synge, Nuttall, Marilyn
  7. 7Dow Crag778 mSouthern · Wainwright, Birkett, Fellranger, Synge, Nuttall, HuMP
  8. 8Buck Pike - Seathwaite Fell744 mSouthern · Birkett, Synge
  9. 9Brown Pike682 mSouthern · Birkett, Synge

In the order you walk them — the same numbers the elevation profile, the stage notes and the pacing table use.

Getting there & parking

Walna Scar Road, Coniston (paid, rough track) — 0.0 km from the start (straight line)
High paid car park above Coniston — Old Man, Dow Crag, Brown Pike with a head start. Fees: pay and display; cards only; RingGo ID 37321 (LDNPA, checked Aug 2026).
Directions (opens in new tab)Something changed here?
🚺 Coniston Bridge (opens in new tab) (~1414 m straight line)🚺 Coniston Ruskin Avenue Car Park (opens in new tab) (~1569 m straight line)
Coppermines and Old Man Car Park (paid) — 0.7 km from the start (straight line)
Nearest fells: Kitty Crag (1.7 km), Long Crag - Yewdale Fells (1.7 km), High Wythow (1.9 km). Paid parking (OSM-tagged). Gravel surface (OSM-tagged).
Directions (opens in new tab)Something changed here?
Coniston Station car park (paid) — 1.2 km from the start (straight line)
On the old station site, west of the village. Fees: pay and display; coins and cards; RingGo ID 37306 (LDNPA, checked Aug 2026).
Directions (opens in new tab)Something changed here?
If it is full: Coniston, Bluebird Car & Coach Park (paid) (0.6 km); Coniston, Ruskin Avenue (paid) (0.6 km); Walna Scar Road, Coniston (paid, rough track) (1.4 km, 143 m up)
Long Crag car park (paid) — 1.4 km from the start (straight line)
Walking base for Long Crag - Yewdale Fells, High Wythow and Low Wythow — the 'The Sun Pub Walk (Coniston)' route starts 265 m away. Also serves 'North of Coniston Birketts'. Paid parking (OSM-tagged).
Directions (opens in new tab)Something changed here?
High Wythow car park (paid) — 1.5 km from the start (straight line)
Walking base for Long Crag - Yewdale Fells, High Wythow and Low Wythow — the 'The Sun Pub Walk (Coniston)' route starts 211 m away. Also serves 'North of Coniston Birketts'. Paid parking (OSM-tagged). OpenStreetMap records it as weekends and school holidays only (2026-07-24 extract; unconfirmed by an operator - check on arrival).
Directions (opens in new tab)Something changed here?

Positions are approximate. Lakeland car parks fill before 9am on fine weekends.

Vehicles are left entirely at their owner’s risk. We list places people park; we cannot vouch for any of them. Judge it on the day: take valuables with you, leave nothing on show, and if a spot feels wrong when you get there, park somewhere else.

Every option near this start, on the parking map →

Water, shelter & getting away

On-route facilities © OpenStreetMap contributors — an absent marker does not mean the facility isn’t there.

Buses

The 505 stops at Coniston, outside The Ruskin Centre. From there it is 1.8 km and 179 m of ascent to this start — a walk in before the walk. The last bus is 20:24 towards Kendal (505) and 18:44 towards Ambleside (505), every day. Checked against the operator’s timetable, 7 September 2026. Times here are a guide, not a promise — leave yourself more than the minute.

The 505 passes this route at 2.4 km (Coniston, outside The Ruskin Centre, 850 m off the line).

Stagecoach 505 “Coniston Rambler”
Windermere – Ambleside – Skelwith Bridge – Hawkshead – Coniston
Catch it from: Windermere · Ambleside
Daily in season (reduced winter service). Best access for the Coniston fells (Old Man, Wetherlam group).

Rural routes change seasonally — confirm on stagecoachbus.com (opens in new tab) or Traveline before travelling.

Toilets and refreshments

At Walna Scar Road, Coniston (paid, rough track), the closest parking we hold to where this route starts:

🚺 Coniston Bridge (opens in new tab) (~1414 m straight line)🚺 Coniston Ruskin Avenue Car Park (opens in new tab) (~1569 m straight line)

Distances are straight lines from the car park, not walking routes. Opening hours change; none of this is checked daily.

Safety & conditions

  • Prison Band, the rocky descent from Black Sails to Swirl Hawse, is steep and eroded with the ground falling away both sides — care needed in mist or wind.
  • Dow Crag's summit sits above a serious east face over Goat's Water — keep slightly left (west) of the top and well back from the gullies and edge, especially in poor visibility.
  • The Grey Friar → Calf Cove → Levers Hawse leg is largely pathless and the round's hardest navigation — careful map-and-compass work in clag.
  • The short final climb to Dow Crag from Goat's Hawse has scrambly steps with moderate exposure — stay on the path and away from the edge.

Check live conditions in the “From the fells” panel, on MWIS (opens in new tab) and the Met Office mountain forecast (opens in new tab) before you set off.

Make it easier or harder

Easier: Quickest bail: from the Old Man of Coniston, take the popular quarry / tourist path straight down to Coniston, omitting the Dow Crag arm — a much shorter day that still bags the big tops.

Why this direction: Walked Wetherlam-first (clockwise): the steep ground (Lad Stones, Prison Band) and the route-finding come early, leaving the long, easy Walna Scar Road as the finish. Anticlockwise (Dow Crag first) is also common.

Short version: turn back at about 9.2 km (drop to Coniston village) — roughly half the distance.

Download

Download GPX

GPX track for your GPS or phone.

Places to stay near this start

Bank Ground Farm (opens in new tab) guest house

about 2.7 km from the start, in a straight line

The strongest single sentence for a family in the whole cluster — "High chairs, cots and stair gates are available on request" — paired with a stated breakfast time, chefs cooking dinner on site, six en-suite B&B rooms plus cottages sleeping 2 to 16, and two EV chargers. The stair gates matter: nobody else within 3 miles mentions them.

Worth knowing: “Pets are more than welcome on the farm, we have purpose built five star accommodation so that you can bring the whole family along, however with the exception of assistant dogs, no pets are allowed inside the cottages and farmhouses.”

Arthur Ransome used the farm as the model for Holly Howe in Swallows and Amazons, and the 1970s film was shot there.

  • Dogs “Pets are more than welcome on the farm, we have purpose built five star accommodation so that you can bring the whole family along, however with the exception of assistant dogs, no pets are allowed inside the cottages and farmhouses.”
  • Family rooms “The traditional farm buildings have been converted into cottages of different sizes, sleeping two to sixteen.”
  • Evening meal “Let our fab chefs prepare you lovely meals, be it breakfast, lunch or dinner.”
  • Children “High chairs, cots and stair gates are available on request.”

Also nearby, but not independent

Coniston Holly How YHA (opens in new tab) hostel

about 1.7 km from the start, in a straight line

The cluster's best wet-walker-plus-family combination inside 2 km: a shared drying room, a highchair, all-you-can-eat cooked breakfast with under-10s at £1, a licensed bar, a self-catering kitchen and a bus stop nearby — and unlike Coppermines you can book a single private room rather than the whole building. Carries two restrictions a reader must see before booking: dogs only in the Camping & Cabins, and under-12s barred from dorm rooms.

Worth knowing: “Pets are not permitted at YHA Coniston Holly How, except in our Camping & Cabins accommodation.”

It is a working Mountain Leader training and assessment base, not just a hostel.

  • Drying room “Shared drying room”
  • Family rooms “Bed in a shared room is offered here Private room is offered here Camping & Cabins is offered here”
  • Evening meal “With tasty breakfasts, packed lunches and evening meals, groups are sure to find something delicious to eat at YHA Coniston Holly How”
  • Packed lunch “With tasty breakfasts, packed lunches and evening meals, groups are sure to find something delicious to eat at YHA Coniston Holly How”
  • Parking “The hostel car park is controlled by an ANPR parking system and is free for guests and patrons from check-in at 17:00 to 10:00 on the day of departure, charges apply outside of these times.”
  • Children “People of all ages are welcome at YHA. Guests aged under 16 must be accompanied by an adult aged 18 years or older.”

YHA Coppermines (opens in new tab) hostel

about 1.6 km from the start, in a straight line

A whole building for one group 500 feet up the Old Man, with a shared drying room, a shared laundry room, a cot, a highchair, ground-floor rooms and free parking — the best answer in the cluster for a large family or a walking group who want the place to themselves. Two conditions decide whether it works: it is exclusive-hire only, so there are no single beds to book, and dogs are only allowed if you take the whole hostel.

Worth knowing: “Pets are not permitted at YHA Coniston Coppermines, except when hiring the whole hostel through YHA Exclusive Hire.”

It sits 500 feet up the mountain already, and they warn that the postcode alone will send your sat nav to somebody's private house.

  • Drying room “Shared drying room”
  • Family rooms “Entire place is offered here Bed in a shared room is not offered here Private room is not offered here”
  • Evening meal “With tasty breakfasts, packed lunches and evening meals, groups are sure to find something delicious to eat at YHA Coniston Coppermines”
  • Packed lunch “With tasty breakfasts, packed lunches and evening meals, groups are sure to find something delicious to eat at YHA Coniston Coppermines”
  • Parking “Free parking is available onsite.”
  • Children “People of all ages are welcome at YHA. Guests aged under 16 must be accompanied by an adult aged 18 years or older.”

What each place says about itself, quoted from their own site. We have not stayed at any of them, and there are no prices, no booking and no affiliate links. Distances are straight lines from the route start, never walking times. Properties found via OpenStreetMap (opens in new tab).

Similar routes nearby

All routes →