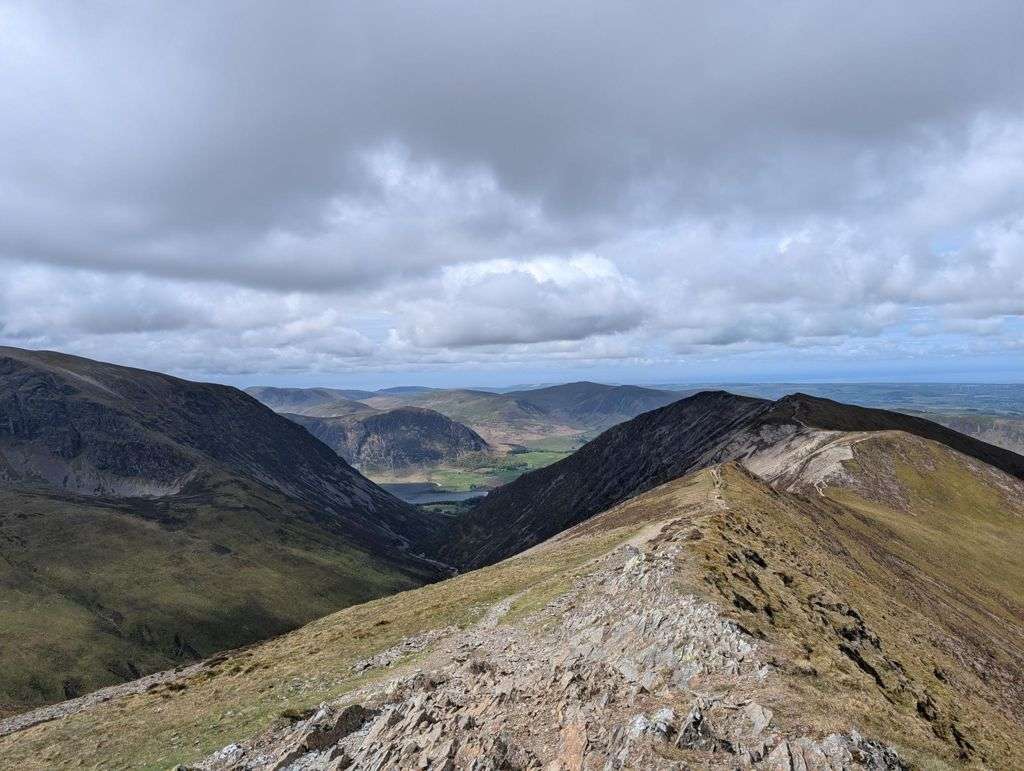
Scar Crags, Causey Pike
Key facts
Difficulty profile
Five independent axes, not one score — all field-checked on the ground here, with nothing left as a desk estimate.
Conditions on this route
We score every Lakeland Wainwright each morning on cloud, wind, rain and underfoot, and this route crosses 4 of them. The worst summit governs the verdict — a route is only as kind as its roughest top.
Modelled guidance — not a substitute for the mountain forecast or your own judgement. See how every fell ranks today →
Daylight & turnaround
By bus: the Honister Rambler (77/77A) (opens in new tab) reaches Braithwaite at 09:47 and the last one back leaves at 18:04. At a steady pace this walk finishes about 14:51. Be off Rowling End by 16:08. Runs daily, including public holidays. From the summer 2026 timetable, read on 21 Aug 2026. Check the timetable before you rely on it.
Daylight is short from October to February — check today’s sunrise and sunset before you set off, and carry a head-torch and spare batteries. On short days, decide your turn-back time before you start.
Why this matters: 78% of Mountain Rescue call-outs come after midday — the day runs out on the way home, not on the way up. See also walking in bad weather and today’s conditions.
1 Barrow2 Outerside3 Scar Crags4 Causey Pike5 Rowling End
Easy 51%Moderate 22%Hard 17%Severe 10%
Free mapping: OpenTopoMap / OpenStreetMap (switch layers top-right).
This walk covers about 11.97 km with around 850 m of ascent, taking in 5 summits. The map above shows the line; the elevation profile and stage notes are below.
Access & barriers
Can a dog, a buggy or dodgy knees manage this route? A quick read from the gates and stiles mapped along the way.
- Dog: Gates and kissing gates only — a dog can do the whole route.
- Buggy: Stiles or rough going on the route.
- Knees: A long, steep ~47% drop around the 8.3 km mark — hard on the knees.
On the line: 4 gates
These are mapped barriers, from OpenStreetMap — coverage in the Lakes is good but not guaranteed complete. Spotted a stile or gate we’ve missed? Tell us (opens in new tab) and we’ll fix it. Barrier data as of 2026-07-25. Access data © OpenStreetMap contributors (via Overpass).
Pacing
| Summit | Cumulative | Ascent | Time (fast–steady) |
|---|---|---|---|
| 1Barrow | 2.2 km | 361 m | 1:02–1:23 |
| 2Outerside | 4.1 km | 533 m | 1:42–2:16 |
| 3Scar Crags | 5.8 km | 732 m | 2:23–3:10 |
| 4Causey Pike | 6.9 km | 772 m | 2:40–3:33 |
| 5Rowling End | 8.2 km | 772 m | 2:55–3:53 |
| Finish | 12.0 km | 850 m | 3:49–5:04 |
Naismith-based estimate — a fast/steady range. Your pace will vary. These use Naismith’s textbook constants (5 km/h, 600 m of ascent an hour). Measured against a pace fitted to 41 recorded Lakeland walks they run about 8% slow, and we have left them that way deliberately: a slow estimate strands nobody.
The walk, stage by stage
- 1
Start → Barrow (2.2 km, 361 m)
Typically starting from the village of Braithwaite, the route begins by ascending the farm track behind Braithwaite Lodge before cutting onto the open fell. The climb up the spine of Barrow is direct and persistent. It is a long, grassy, heather-clad ridge that offers an excellent, steadily rising warm-up. The path is well-defined and climbs relentlessly with a 16% average gradient, though it lacks the brutal rocky steps of the higher fells
WaypointsBraithwaite (approx. 70m): The valley-bottom starting point. Braithwaite Lodge: The farm marking the transition from village tarmac to fell track. Barrow Summit (455m): The modest, heathery summit marking the end of the first ridge climb, offering excellent views into the Coledale horseshoe
Decision pointColedale Beck: The deep ravine of Coledale runs parallel to your right (west). Keep this massive trench on your right hand side to ensure you stay on the ridge spine
Easy to get wrongSummer Bracken: The lower slopes of Barrow are completely smothered in dense bracken during the summer months. Stick rigidly to the main trod, as pushing through it is exhausting and highly increases the risk of tick bites. False Summits: The ridge bows slightly, creating a few minor false horizons on the way up that can tease you if you are pushing the pace
If you need to get offSimply turn around and walk back down the grassy ridge directly to Braithwaite. The ridge acts as a perfect, safe funnel back to the village
- 2
Barrow → Outerside (1.9 km, 173 m)
From the summit of Barrow, the path drops south-west into the wide, heather-filled depression known as Barrow Door. From this saddle, the route immediately tackles the eastern flank of Outerside. The path here winds up through thick heather and blueberry bushes on a moderate 9% gradient, ending at the neat, compact summit of Outerside
WaypointsBarrow Door (approx. 390m): The distinct col separating Barrow from Outerside. Outerside Summit (568m): A rocky little peak sitting relatively isolated between the major ridges of Coledale and Causey Pike
Decision pointLine of Sight: Outerside is clearly visible ahead. In clear weather, aim directly for the highest point. Coledale Track: If the mist is down, ensure the wide, flat floor of the Coledale valley remains below you to your right
Easy to get wrongBoggy Col: The depression at Barrow Door can be a swamp after heavy rain. The path often braids here as walkers try to find drier ground. Heather Braiding: As you climb Outerside, the path splits into multiple minor sheep trods through the heather. They all generally head up, but some are rougher than others
If you need to get offFrom the col at Barrow Door, you can bail right (north-west), dropping down a grassy path to intercept the main Coledale mine track, which provides a wide, flat walk back to Braithwaite
- 3
Outerside → Scar Crags (1.8 km, 198 m)
Leaving Outerside, the route drops south-west into the notoriously wet saddle at High Moss, near Sail Pass. From this boggy depression, the real mountain work begins. You must tackle the steep, zig-zagging climb up the side of the main ridge to reach Scar Crags. The terrain shifts from squelchy peat to loose scree and shattered rock as you gain the crest of the high ridge
WaypointsHigh Moss: The sprawling, boggy depression between Outerside and the main ridge. Scar Crags Summit (672m): A spectacular, airy summit on the main ridge line, featuring a sheer drop to the north
Decision pointThe Ridge Line: Once you finish the steep pull out of High Moss and hit the crest, the navigation becomes foolproof. The ridge itself is your absolute handrail
Easy to get wrongThe High Moss Bog: This area is an unavoidable sponge. Prepare for wet boots, as navigating around the worst of the peat hags is tedious. Steep Pull to the Ridge: The ascent out of the saddle to Scar Crags is steep and loose. It is a sharp shock to the lungs after the gentler rolling terrain of Barrow and Outerside. Crag Edges: Once on Scar Crags, the northern side (to your left as you approach, or right as you face Causey Pike) is a series of sheer, fatal drops
If you need to get offSafe Route: If you don't want to tackle the high ridge, drop down from High Moss heading east towards Stoneycroft Gill. This path leads safely down into the Newlands Valley. Trap Warning: Do not attempt to bail north directly off the summit of Scar Crags; the terrain is vertical
- 4
Scar Crags → Causey Pike (1.1 km, 40 m)
This is one of the most enjoyable ridge walks in the Lake District. It is a short, exhilarating, and relatively flat traverse heading straight east along the crest from Scar Crags to Causey Pike. The path is rocky but straightforward, offering massive, plunging views into the Newlands Valley to the south and Coledale to the north
WaypointsThe Ridge Path: The unmistakable track linking the two summits. Causey Pike Summit (637m): Famous for its distinct "bobble" or "pimple" shape, marked by a rocky outcrop that requires a final few steps of minor scrambling
Decision pointThe Ridge Crest: Keep to the highest ground. The path is heavily eroded into the bedrock and impossible to lose
Easy to get wrongWind Exposure: This ridge takes the absolute brunt of winds funneling through the valleys. On a stormy day, it can be difficult to stand upright here. Minor Scrambling: Reaching the very top of Causey Pike’s bobble requires putting your hands on the rock. It is simple but can feel exposed
If you need to get offThere is no safe exit off the flanks of this ridge. If the wind is too strong, you must retrace your steps west back to the col at Scar Crags/Sail Pass to drop down into the valleys
- 5
Causey Pike → Rowling End (1.2 km, 0 m)
From the summit of Causey Pike, the route drops aggressively eastwards off the famous "bobble." This initial descent is steep, rocky, and requires hands-on downclimbing over polished rock steps. Once you clear this craggy section, the gradient eases into a grassy, undulating ridge descent heading over Sleet Hause and down to the subsidiary bump of Rowling End
WaypointsThe Causey Pike Downclimb: The steep, rocky steps immediately leaving the summit. Sleet Hause: The minor grassy saddle on the descent ridge. Rowling End (433m): The final notable prominence on the eastern ridge before the steep plunge to the valley floor
Decision pointThe Eastern Ridge: The ridge line extending down to Rowling End is visually obvious, pointing directly toward Derwentwater and the Skiddaw massif in the distance
Easy to get wrongThe Downclimb: The rocky step off Causey Pike is intimidating for beginners. It is highly polished by thousands of boots and becomes dangerously slick in the rain or ice. Take your time and face the rock if necessary. Knee Impact: Once off the rocks, the descent along the ridge is sustained and steep, putting a lot of pressure on tired joints
If you need to get offBefore committing to the steep, hands-on downclimb off Causey Pike, your only bail is to turn back to Scar Crags. Once you have descended the rocky steps, you are committed to the Rowling End descent route. Do not drift south off the ridge into the steep, pathless bracken of Rigg Beck
Rowling End → Finish (3.8 km, 78 m)
Leaving Rowling End, the path plunges directly down the steep, grassy nose of the fell, zigzagging tightly through heavy bracken to reach the valley floor at Stoneycroft. From here, the rugged mountain terrain ends. The final section is an undulating valley walk along the quiet Newlands Valley road, contouring the base of Barrow back to the starting point in Braithwaite
WaypointsStonycroft Gill / Bridge: The point where you hit the valley floor and cross the water. Newlands Valley Road: The tarmac road tracing the bottom of the fells. Braithwaite: The finish point
Decision pointStonycroft Gill: Aim for the bridge at the base of the fell. The Road: Once you hit the tarmac at Stoneycroft, turn left (north) and simply follow the road. It acts as an absolute handrail, skirting the base of the fells all the way back to the village
Easy to get wrongJarring Final Descent: The grassy drop off Rowling End is fiercely steep. When wet, this grassy slope is a notorious slip hazard; trekking poles are a massive asset here. Traffic Hazard: The walk back to Braithwaite is on a narrow country lane. While quiet, cars can appear suddenly around the blind, walled corners. Mental Fatigue: The 3.8 km walk out on tarmac can feel like a slog after the high-adrenaline ridge walk
If you need to get offThis is the final exit stage. The steep descent off Rowling End commits you to the Newlands Valley floor. Once on the road, you are perfectly safe and on the direct route back to your car
Summits bagged (5)
- 1Barrow455 m
- 2Outerside568 m
- 3Scar Crags672 m
- 4Causey Pike637 m
- 5Rowling End433 m
In the order you walk them — the same numbers the elevation profile, the stage notes and the pacing table use.
Getting there & parking
Positions are approximate. Lakeland car parks fill before 9am on fine weekends.
Vehicles are left entirely at their owner’s risk. We list places people park; we cannot vouch for any of them. Judge it on the day: take valuables with you, leave nothing on show, and if a spot feels wrong when you get there, park somewhere else.
Every option near this start, on the parking map →
Water, shelter & getting away
On-route facilities © OpenStreetMap contributors — an absent marker does not mean the facility isn’t there.
Buses
The 77 stops at Braithwaite, at Croft Terrace, 10 m from this start. Last bus: Monday to Friday 22:27 towards Workington (X5) and 17:37 towards Keswick (77) and 16:37 towards Cockermouth (77); Saturday 00:22 (+1) (after midnight) towards Workington (X5) and 17:37 towards Keswick (77) and 16:37 towards Cockermouth (77); Sunday 20:17 towards Workington (X5) and 17:37 towards Keswick (77) and 16:37 towards Cockermouth (77). Checked against the operator’s timetable, 12 September 2026. Times here are a guide, not a promise — leave yourself more than the minute.
The 77 passes this route at 0.0 km (Braithwaite, at Croft Terrace, 10 m off the line).
Rural routes change seasonally — confirm on stagecoachbus.com (opens in new tab) or Traveline before travelling.
If the parking is full
There is a fallback here, but it is a weak one. Some of the 3 below tend to fill for the same reasons at the same time. Treat the list as one-and-a-bit options rather than 3.
- Rowling End car park (paid)
- Braithwaite village (roadside/small areas)
- Barrow, north-east (layby)
Worked out from the parking we hold within walking reach of this route and the other walks each place serves — two places that serve the same walks fill for the same reasons. We are not saying whether anywhere has spaces today, and we never will: this is what exists, not what is free.
Toilets and refreshments
At Braithwaite village (roadside/small areas), the closest parking we hold to where this route starts:
Distances are straight lines from the car park, not walking routes. Opening hours change; none of this is checked daily.
When the sun reaches the tops
Not sunrise — the moment the sun clears the skyline from that summit, which on a fell with high ground to its east can be a good deal later. The two equinoxes are shown because they fall in the walking season, and late December too wherever a top keeps you waiting then; the clock gap between the equinoxes is British Summer Time, not the hill. Rounded to the nearest quarter hour and meant as a general idea, not a schedule.
- Barrow — in late March the sun reaches it around 06:30, with the sunrise. In late September, about 07:00. It waits longest in midsummer — about a quarter of an hour after sunrise.
- Outerside — in late March the sun reaches it around 06:15, with the sunrise. In late September, about 07:00. It waits longest in late December — about half an hour after sunrise.
- Scar Crags — in late March the sun reaches it around 06:15, with the sunrise. In late September, about 07:00.
- Causey Pike — in late March the sun reaches it around 06:15, with the sunrise. In late September, about 07:00.
Modelled from a 30 m elevation model against each summit’s own skyline — the same figures the fell pages carry, never observed. Cloud is not in it.
Safety & conditions
Check live conditions in the “From the fells” panel, on MWIS (opens in new tab) and the Met Office mountain forecast (opens in new tab) before you set off.
Make it easier or harder
Short version: turn back at about 6.4 km (drop to Start) — roughly half the distance.
Places to stay near this start
From Whinlatter: 12 places in Keswick